
< Previous | Contents | Next >
Creating a Bootable Kali USB Drive on Linux
Creating a bootable Kali Linux USB key in a Linux environment is easy. The GNOME desktop envi- ronment, which is installed by default in many Linux distributions, comes with a Disks utility (in the gnome-disk-utility package, which is already installed in the stock Kali image). That program shows a list of disks, which refreshes dynamically when you plug or unplug a disk. When you se- lect your USB key in the list of disks, detailed information will appear and will help you confirm that you selected the correct disk. Note that you can find its device name in the title bar as shown in Figure 2.3, “GNOME Disks” [page 21].
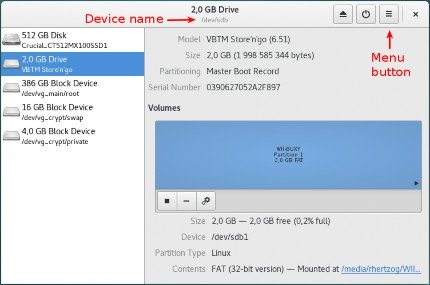
Figure 2.3 GNOME Disks
Click on the menu button and select Restore Disk Image... in the displayed pop-up menu. Select the ISO image that you formerly downloaded and click on Start Restoring... as shown in Figure 2.4, “Restore Disk Image Dialog” [page 21].
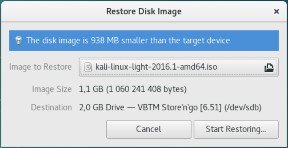
Figure 2.4 Restore Disk Image Dialog
Enjoy a cup of coffee while it finishes copying the image on the USB key (Figure 2.5, “Progression of the Image Restoration” [page 22]).
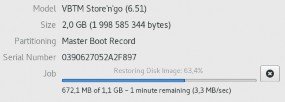
Figure 2.5 Progression of the Image Restoration
Create the Bootable USB Even though the graphical process is fairly straightforward, the operation is just as Drive from the Command easy for command line users. Line When you insert your USB key, the Linux kernel will detect it and assign it a name, which is printed in the kernel logs. You can find its name by inspecting the logs returned by dmesg. | |
$ dmesg [...] [234743.896134] usb 1-1.2: new high-speed USB device number 6 using ehci-pci [234743.990764] usb 1-1.2: New USB device found, idVendor=08ec, idProduct=0020 [234743.990771] usb 1-1.2: New USB device strings: Mfr=1, Product=2, ➥ SerialNumber=3 [234743.990774] usb 1-1.2: Product: Store’n’go [234743.990777] usb 1-1.2: Manufacturer: Verbatim [234743.990780] usb 1-1.2: SerialNumber: 0390627052A2F897 [234743.991845] usb-storage 1-1.2:1.0: USB Mass Storage device detected [234743.992017] scsi host7: usb-storage 1-1.2:1.0 [234744.993818] scsi 7:0:0:0: Direct-Access VBTM Store’n’go 6.51 ➥ PQ: 0 ANSI: 0 CCS [234744.994425] sd 7:0:0:0: Attached scsi generic sg1 type 0 [234744.995753] sd 7:0:0:0: [sdb] 3903487 512-byte logical blocks: (2.00 GB ➥ /1.86 GiB) [234744.996663] sd 7:0:0:0: [sdb] Write Protect is off [234744.996669] sd 7:0:0:0: [sdb] Mode Sense: 45 00 00 08 [234744.997518] sd 7:0:0:0: [sdb] No Caching mode page found [234744.997524] sd 7:0:0:0: [sdb] Assuming drive cache: write through [234745.009375] sdb: sdb1 [234745.015113] sd 7:0:0:0: [sdb] Attached SCSI removable disk | |
Now that you know that the USB key is available as /dev/sdb, you can proceed to copy the image with the dd command: | |
# dd if=kali-linux-light-2017.1-amd64.iso of=/dev/sdb 2070784+0 records in 2070784+0 records out 1060241408 bytes (1.1 GB, 1011 MiB) copied, 334.175 s, 3.2 MB/s | |
Note that you need root permissions for this operation to succeed and you should also ensure that the USB key is unused. That is, you should make sure that none of its partitions are mounted. The command also assumes that it is run while in the directory hosting the ISO image, otherwise the full path will need to be provided. | |
For reference, if stands for “input file” and of for “output file.” The dd command reads data from the input file and writes it back to the output file. It does not show any progress information so you must be patient while it is doing its work (It is not unusual for the command to take more than half an hour!). Look at the write activity LED on the USB key if you want to double check that the command is working. The statistics shown above are displayed only when the command has completed. On OS X/macOS, you can also press CTRL+T during the operation to get statistical information about the copy including how much data has been copied.
For reference, if stands for “input file” and of for “output file.” The dd command reads data from the input file and writes it back to the output file. It does not show any progress information so you must be patient while it is doing its work (It is not unusual for the command to take more than half an hour!). Look at the write activity LED on the USB key if you want to double check that the command is working. The statistics shown above are displayed only when the command has completed. On OS X/macOS, you can also press CTRL+T during the operation to get statistical information about the copy including how much data has been copied.