
< Previous | Contents | Next >
Partitioning
Partitioning is an indispensable step in installation, which consists of dividing the available space on the hard drives into discrete sections (partitions) according to the intended function of the computer and those partitions. Partitioning also involves choosing the file systems to be used. All of these decisions will have an influence on performance, data security, and server administration.
The partitioning step is traditionally difficult for new users. However, the Linux file systems and partitions, including virtual memory (or swap partitions) must be defined as they form the foun- dation of the system. This task can become complicated if you have already installed another operating system on the machine and you want the two to coexist. In this case, you must make sure not to alter its partitions, or if need be, resize them without causing damage.
To accommodate more common (and simpler) partition schemes, most users will prefer the Guided mode that recommends partition configurations and provides suggestions each step of the way. More advanced users will appreciate the Manual mode, which allows for more advanced configu- rations. Each mode shares certain capabilities.
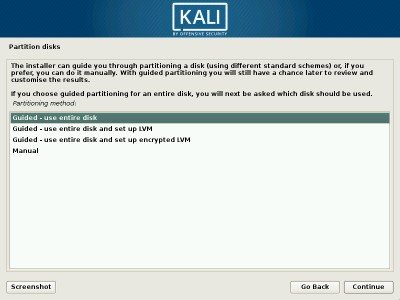
Figure 4.8 Choice of Partitioning Mode
Guided Partitioning The first screen in the partitioning tool (Figure 4.8, “Choice of Partitioning Mode” [page 74]) presents entry points for the guided and manual partitioning modes. “Guided - use entire disk” is the simplest and most common partition scheme, which will allocate an entire disk to Kali Linux.
The next two selections use Logical Volume Manager (LVM) to set up logical (instead of physical), optionally encrypted, partitions. We will discuss LVM and encryption later in this chapter.
Finally, the last choice initiates manual partitioning, which allows for more advanced partitioning schemes, such as installing Kali Linux alongside other operating systems. We will discuss manual mode in the next section.
In this example, we will allocate an entire hard disk to Kali, so we select “Guided - use entire disk” to proceed to the next step.
The next screen (shown in Figure 4.9, “Disk to Use for Guided Partitioning” [page 75]) allows you to choose the disk where Kali will be installed by selecting the corresponding entry (for exam- ple, “Virtual disk 1 (vda) - 32.2 GB Virtio Block Device”). Once selected, guided partitioning will continue. This option will erase all of the data on this disk, so choose wisely.
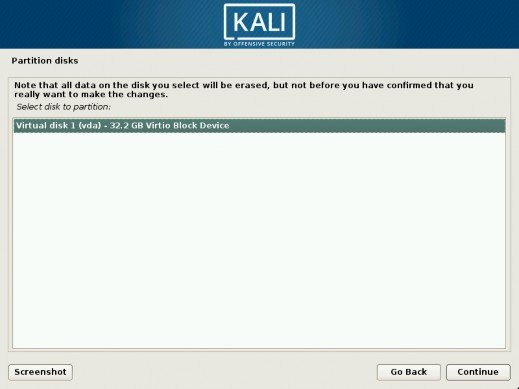
Figure 4.9 Disk to Use for Guided Partitioning
Next, the guided partitioning tool offers three partitioning methods, which correspond to differ- ent usages, as shown in Figure 4.10, “Guided Partition Allocation” [page 76].
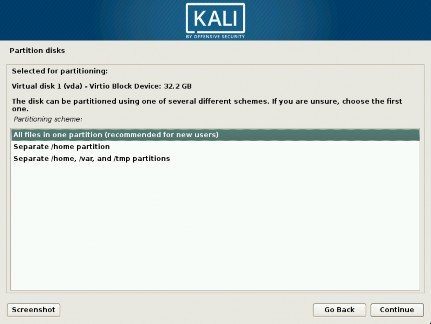
Figure 4.10 Guided Partition Allocation
The first method is called “All files in one partition.” The entire Linux system tree is stored in a single file system, corresponding to the root (”/”) directory. This simple and robust partitioning scheme works perfectly well for personal or single-user systems. Despite the name, two partitions will actually be created: the first will house the complete system, the second the virtual memory (or “swap”).
The second method, “Separate /home/ partition,” is similar, but splits the file hierarchy in two: one partition contains the Linux system (/), and the second contains “home directories” (meaning user data, in files and subdirectories available under /home/). One benefit to this method is that it is easy to preserve the users’ data if you have to reinstall the system.
The last partitioning method, called “Separate /home, /var, and /tmp partitions,” is appropriate for servers and multi-user systems. It divides the file tree into many partitions: in addition to the root (/) and user accounts (/home/) partitions, it also has partitions for server software data (/var/), and temporary files (/tmp/). One benefit to this method is that end users cannot lock up the server by consuming all available hard drive space (they can only fill up /tmp/ and /home/). At the same time, daemon data (especially logs) can no longer clog up the rest of the system.
After choosing the type of partition, the installer presents a summary of your selections on the screen as a partition map (Figure 4.11, “Validating Partitioning” [page 77]). You can modify each partition individually by selecting a partition. For example, you could choose another file system if the standard (ext4) isn’t appropriate. In most cases, however, the proposed partitioning is rea- sonable and you can accept it by selecting “Finish partitioning and write changes to disk.” It may go without saying, but choose wisely as this will erase the contents of the selected disk.
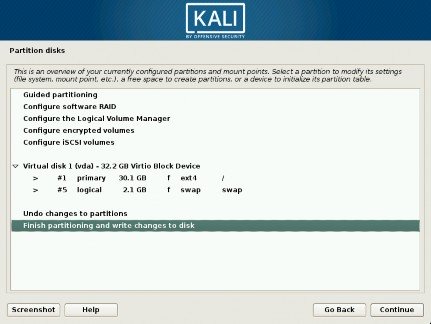
Figure 4.11 Validating Partitioning
Manual Partitioning Selecting Manual at the main “Partition disks” screen (Figure 4.8, “Choice of Partitioning Mode” [page 74]) permits greater flexibility, allowing you to choose more advanced configurations and specifically dictate the purpose and size of each partition. For example, this mode allows you to install Kali alongside other operating systems, enable a software-based redun- dant array of independent disks (RAID) to protect data from hard disk failures, and safely resize existing partitions without losing data, among other things.
Shrinking a Windows To install Kali Linux alongside an existing operating system (Windows or other), you
Partition will need available, unused hard drive space for the partitions dedicated to Kali. In most cases, this means shrinking an existing partition and reusing the freed space.
If you are using the manual partitioning mode, the installer can shrink a Windows partition quite easily. You only need to choose the Windows partition and enter its new size (this works the same with both FAT and NTFS partitions).
If you are a less experienced user working on a system with existing data, please be very careful with this setup method as it is very easy to make mistakes that could lead to data loss.
The first screen in the manual installer is actually the same as the one shown in Figure 4.11, “Vali- dating Partitioning” [page 77], except that it doesn’t include any new partitions to create. It is up to you to add those.
First, you will see an option to enter “Guided partitioning” followed by several configuration op- tions. Next, the installer will show the available disks, their partitions, and any possible free space that has not yet been partitioned. You can select each displayed element and press the Enter key to interact with it, as usual.
If the disk is entirely new, you might have to create a partition table. You can do this by selecting the disk. Once done, you should see free space available within the disk.
To make use of this free space, you should select it and the installer will offer you two ways to create partitions in that space.
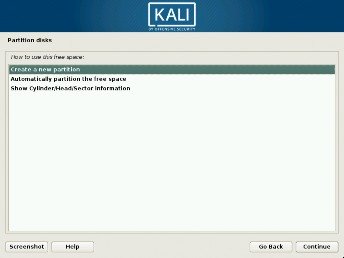
Figure 4.12 Creating Partitions in the Free Space
The first entry will create a single partition with the characteristics (including the size) of your choice. The second entry will use all the free space and will create multiple partitions in it with the help of the guided partitioning wizard (see section 4.2.1.12.1, “Guided Partitioning” [page 75]). This option is particularly interesting when you want to install Kali alongside another operating system but when you don’t want to micro-manage the partition layout. The last entry will show the cylinder/head/sector numbers of the start and of the end of the free space.
When you select to “Create a new partition,” you will enter into the meat of the manual parti- tioning sequence. After selecting this option, you will be prompted for a partition size. If the disk
uses an MSDOS partition table, you will be given the option to create a primary or logical partition. (Things to know: You can only have four primary partitions but many more logical partitions. The partition containing /boot, and thus the kernel, must be a primary one, logical partitions reside in an extended partition, which consumes one of the four primary partitions.) Then you should see the generic partition configuration screen:
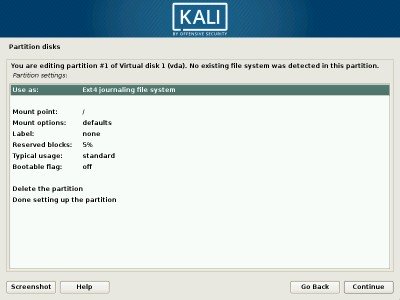
Figure 4.13 Partition Configuration Screen
To summarize this step of manual partitioning, let’s take a look at what you can do with the new partition. You can:
• Format it and include it in the file tree by choosing a mount point. The mount point is the directory that will house the contents of the file system on the selected partition. Thus, a partition mounted at /home/ is traditionally intended to contain user data, while “/” is known as the root of the file tree, and therefore the root of the partition that will actually host the Kali system.
• Use it as a swap partition. When the Linux kernel lacks sufficient free memory, it will store inactive parts of RAM in a special swap partition on the hard disk. The virtual memory sub- system makes this transparent to applications. To simulate the additional memory, Win- dows uses a swap (paging) file that is directly contained in a file system. Conversely, Linux uses a partition dedicated to this purpose, hence the term swap partition.
• Make it into a “physical volume for encryption” to protect the confidentiality of data on certain partitions. This case is automated in the guided partitioning. See section 4.2.2, “In- stallation on a Fully Encrypted File System” [page 85] for more information.
• Make it a “physical volume for LVM” (not covered in this book). Note that this feature is used by the guided partitioning when you set up encrypted partitions.
• Use it as a RAID device (not covered in this book).
• Choose not to use the partition, and leave it unchanged.
When finished, you can either back out of manual partitioning by selecting “Undo changes to partitions” or write your changes to the disk by selecting “Finish partitioning and write changes to disk” from the manual installer screen (Figure 4.11, “Validating Partitioning” [page 77]).