
< Previous | Contents | Next >
4.5.2. Performing Basic Drawing Operations
Procedure 4.13. To launch OpenOffice.org Draw:
1. On the Applications menu, select Graphics and then OpenOffice.org Drawing. The main components of the Draw window are shown in the following graphic:
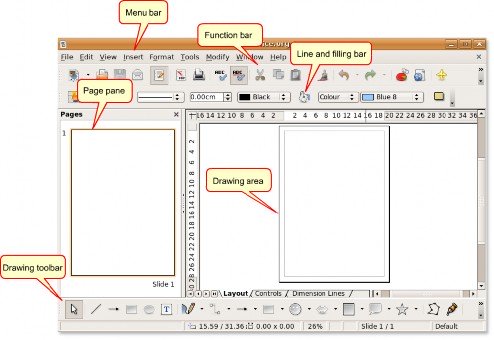
Figure 4.73. The Draw Window
2. The drawings are created in the drawing area, which is surrounded by the following toolbars:
• The Menu bar lists the main menus available in Draw. It includes options to manage, edit and view the format of your drawings.
• The Function bar displays icons to perform tasks such as Open, Save, Copy, Cut and Paste.
• The Line and Filling bar includes specific drawing tools to modify the appearance of a selected object such as line style, colour and thickness; fill style and colour.
• The Drawing toolbar is the most important toolbar in Draw. It contains all the necessary functions for drawing various geometric and freehand shapes. Creating basic shapes in Draw requires the extensive use of this toolbar. However, you have to further edit, combine and manipulate them to create complex objects.
You can vary the number and position of the visible tools to make the interface look a bit different. To add or remove a toolbar from the Draw window:
3. On the View menu, point to Toolbars. The Toolbar list displays the toolbars available, with a check mark next to the toolbars that are displayed. To remove a toolbar from the Draw window, clear the corresponding check mark and click the toolbar without a check mark to add it to the window.
Procedure 4.14. Creating Objects
To create an object by using the Drawing toolbar:
1. Click a specific object button such as Rectangle or Ellipse on the Drawing toolbar, and place the mouse cursor at the point in the drawing area where you want the object to start.
2. Press the left button on the mouse, drag the cursor to where you want the object to end and release the button. The object appears in the Drawing area.
Selecting Objects. Before making any changes to an object, you need to select the object. Draw provides the following options to select an object:
• Direct Selection: Click the object to select it.
• Selection by Framing: On the Drawing toolbar, click the Select button and drag a large rectangle around the object to select it. This option is useful for selecting multiple objects in the drawing area.
![]() Note:
Note:
You have to enclose the object(s) completely in the rectangle to select them.

Figure 4.74. Selecting by Framing
• Selecting hidden objects: To select an object that is covered by another object, press Alt key and click the object you want to select.
![]() Note:
Note:
To be able to select a hidden object, you must know the position of that object relative to the
objects on top.
Editing Objects. When creating objects, you may have to edit them or change their properties to get the desired output. However, you may not always find that flexibility in the default software settings. For example, you cannot change the shape of the square to a rectangle or rotate the square on its own axis by using the default Drawing toolbar. To perform these tasks, Draw provides various other options with the required flexibility, such as:
![]() Note:
Note:
All the options covered in the subsequent sections apply to a selected object or a group of objects.
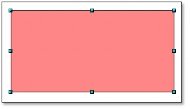
You can identify a selected object from any other by the small, coloured square or circle around the object. These squares or circles are called handles and form a rectangular frame that is just big enough to contain the object.
Procedure 4.15. Modifying Object Size
1. In the Drawing area, select the created object by clicking it. Handles appear on the object.
![]()
Figure 4.75. Selecting an Object
2. Place the mouse cursor over one of the handles. When the cursor becomes a double-headed arrow, drag the cursor in the direction of the arrow to modify the size of the object. If you choose a corner handle, you will resize the object along two axes at the same time. If you use a side handle, the objects will only be resized along one axis. The outline of the resulting new object appears as a dotted line.
3. Release the mouse button when the object is sized correctly. The dotted line disappears, and the resized object appears.
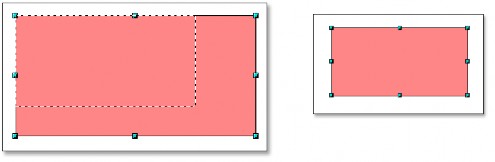
Figure 4.76. Modifying the Object
Arranging Objects. If the document you are working on includes many overlapping objects, editing of indi- vidual objects (which may or may not be visible) might pose a challenge. Fortunately, Draw provides a way to rearrange objects without affecting their layout.
Procedure 4.16. To change the arrangement of objects:
1. In the drawing area, right-click the object you want to rearrange, point to Arrange and select the appropriate option from the Arrange list.
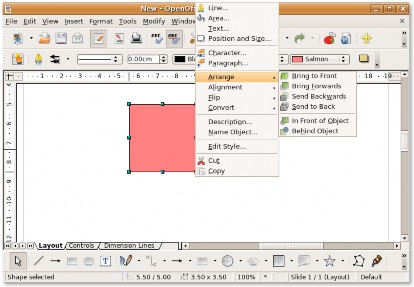
Figure 4.77. Rearranging the Object
2. If you select the Send Backward option, the output is as shown in the following graphic:
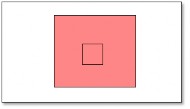
Figure 4.78. Object Sent Backwards
Duplicating Objects. Often, you may need to create multiple objects of the same shape and size. In Draw, you can duplicate or make multiple copies of an object. The copies can be identical or differ in size, colour, orientation and location.
Procedure 4.17. To create multiple copies of an object:
1. Click the object to be copied, click Edit and select the Duplicate option. The Duplicate dialogue box opens.
2. Specify the appropriate values in the Duplicate dialogue box, and click OK to display the output in the drawing area.
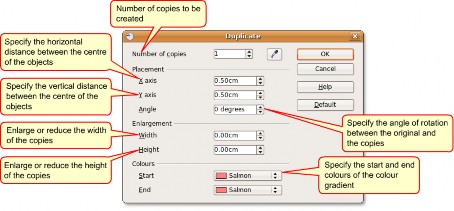
Figure 4.79. Duplicating Objects
Grouping and Combining Objects. When creating or editing an object, the object might be displaced from its original position. This change in location disturbs the relative position of the object to the others in the drawing. This could be critical where accuracy, in terms of position, is important such as in architectural drawings. Using Draw, you can combine drawing objects in two distinct ways, grouping and combining.
Grouping Objects. Grouping objects is like putting them into a container, where the objects are grouped with each other but retain their individual identities. You can move the group as one entity and apply changes to all the enclosed objects. A group can always be undone, and the objects that constitute the group can always be manipulated separately.
Procedure 4.18. To group objects:
1. In the Drawing area, select all the objects you want to include in the group. Right click any selected object, and then select the Group option.
![]()
2. Click any object in the group; handles appear around the entire group instead of around an object. You can now modify the entire group, without applying effects to objects individually. To resize a group:
• Place the mouse cursor over one of the handles. When the cursor becomes a double-headed arrow, drag the cursor to increase or decrease the size of the objects in the group. All the objects in the group are resized equally.
Procedure 4.19. You can also edit a single object in the group without breaking it. To edit individual objects in a group:
1. Double-click an object in the group. You can now enter the group and work on individual objects.
2. Click the object you want to edit; the handles appear around that object. In this mode, you can edit, add or delete this object.
3. To re-instate the group after modifying the object, double-click anywhere outside the selection frame.
![]()
Note:
You can group objects of all shapes and sizes. You can group objects in 2D, 3D or a combination of both. However, you can combine only overlapping 2D objects.
Combining Objects. Combining drawing objects is similar to grouping, except that combining creates a permanent fusion of objects, leading to the formation of a new object. The original objects are no longer available as individual entities, and you cannot enter the group to edit the individual objects. When you combine the objects, the group takes on the properties of the lower-most object in the arrangement.
Procedure 4.20. To combine objects:
1. In the drawing area, select multiple 2D objects.
![]()
Note:
The lower-most object in the following graphic is the blue object.
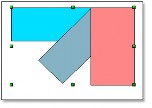
Figure 4.80. Combining Objects
2. Right-click any of the objects in the selection and click the Combine option in the list. Where the objects overlap, the overlapping zone is either filled or empty, depending on the number of overlaps. When the number of overlaps is even, you get an empty space. When the number of overlaps is odd, you get a filled area.
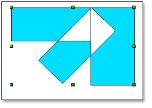
Figure 4.81. The Overlapping Zone
3. After you have combined the objects, you can select the combined objects as an entity. However, you will not be able to select the empty area in the object.
To split the objects:
• In the Drawing area, right-click the combination created in the previous procedure and select the Split option from the list.
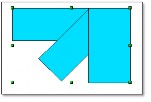
Figure 4.82. Splitting Objects
Note that the objects return to their original status. However, the properties of the objects have now changed as per the last object in the arrangement.
Editing Colours and Textures. When creating a drawing, you may need to work with objects of variable colours and textures in the same drawing area. You can customise the area fill of an object by using the Line and Fill toolbar.
![]() Note:
Note:
The OpenOffice.org term for the inside of an object is area fill. The area fill of an object can be of
uniform colour, a gradient or an image.
Procedure 4.21. Editing a Colour Fill
To edit the colour fill of an object:
1. In the drawing area, select the object you want to edit and click the Area button on the Line and Fill
toolbar. The Area dialogue box opens.
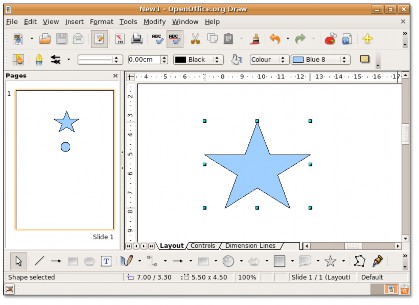
Figure 4.83. Editing a Colour Fill
2. The Area dialogue box provides the option to change the existing colour fill of the object. Click the Colours
tab, select a colour listed under the Table category and click OK to apply the change.
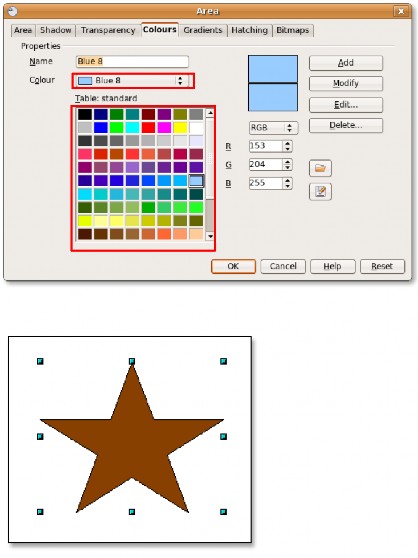
Figure 4.84. Selecting a Colour Fill
3. The Table category lists the standard colours or the colours that are used most often. However, if you need a colour or shade that is not available in the list, go ahead and create it! To define a custom colour:
a. Click the standard colour closest to your needs, and specify the RGB ratio to change its tone and hue.
![]() Note:
Note:
Draw provides you two options to define a colour. You can specify the colour in the RGB
or CMYK ratio. For CMYK, click RGB and then select CMYK from the options.
b. If you want to add a new custom colour to the available list, type its name in the Name box, specify the RGB ratio and click Add. The standard list under the Table category displays the new colour.
![]() Nice to Know:
Nice to Know:
Every colour is specified by a combination of the three primary colours, Red, Green and
Blue, hence the notation RGB.
c. Click OK to apply the change.
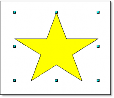
Figure 4.85. The Customised Colour Fill
Editing a Gradient Fill. A gradient is a smooth transition between two different colours or shades of the same colour, which you can apply to a drawing object. To edit the gradient fill of an object:
In the Drawing area, select the object you want to edit and click the Area button on the Line and Fill toolbar. The Area dialogue box opens.
Click the Gradients tab, select a gradient from the gradient list and click OK to apply the change to the object.
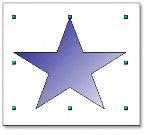
Figure 4.86. Editing a Gradient Fill
Editing Text. Draw provides you the following options to insert text in the Drawing area:
• The Text tool on the Drawing toolbar: You can create a text frame anywhere in the drawing area, and you can work with this text box like you do with any other object.
• Callouts next to the object: You can use this when you want to relate the text to the object. Click the Callouts
tool on the Drawing toolbar.
• Text superimposed on a drawing object: Double-click the object. A text box opens. Type the necessary text in it.
The following graphic displays various options for inserting text relevant to an object in the Drawing area:
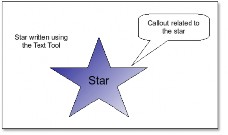
Figure 4.87. Editing Text in the Drawing Area
Visual Effects. Apart from offering the basic drawing tools, Draw provides scope for you to add some visual effects to your drawings.
Cross-Fading. The cross-fading feature in Draw transforms one shape into another. The result is a new group of objects, including the start and end objects and the intermediate shapes.
Procedure 4.22. To cross-fade:
1. Create two objects of different shapes in the drawing area and select them.
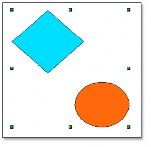
Figure 4.88. Applying Visual Effects
2. On the Edit menu, click the Cross-fading option to display the Cross-fading dialogue box.
3. In the Cross-fading dialogue box, select the number of incremental objects between the ends. Retain the default selection for smoother transition, and click OK to display the result in the drawing area.
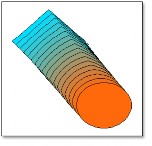
![]()
Note:
Figure 4.89. Cross-Faded Objects
You can vary the order of the objects by changing their arrangement in the drawing area.