
< Previous | Contents | Next >
The -u and -a options give additional information. For more options and what they do, refer to the Info pages.
In the next section, we will see how one process can create another.
![]()
4.1.5. Life and death of a process
4.1.5.1. Process creation
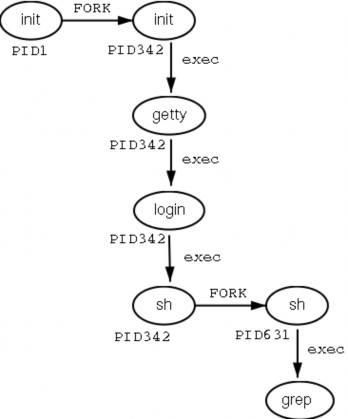
A new process is created because an existing process makes an exact copy of itself. This child process has the same environment as its parent, only the process ID number is different. This procedure is called forking.
After the forking process, the address space of the child process is overwritten with the new process data. This is done through an exec call to the system.
The fork-and-exec mechanism thus switches an old command with a new, while the environment in which the new program is executed remains the same, including configuration of input and output devices, environment variables and priority. This mechanism is used to create all UNIX processes, so it also applies to the Linux operating system. Even the first process, init, with process ID 1, is forked during the boot procedure in the
so-called bootstrapping procedure.
This scheme illustrates the fork-and-exec mechanism. The process ID changes after the fork procedure:
Figure 4-1. Fork-and-exec mechanism
There are a couple of cases in which init becomes the parent of a process, while the process was not started by init, as we already saw in the pstree example. Many programs, for instance, daemonize their child processes, so they can keep on running when the parent stops or is being stopped. A window manager is a typical example; it starts an xterm process that generates a shell that accepts commands. The window manager then denies any further responsibility and passes the child process to init. Using this mechanism, it is possible to change window managers without interrupting running applications.
Every now and then things go wrong, even in good families. In an exceptional case, a process might finish while the parent does not wait for the completion of this process. Such an unburied process is called a zombie process.
![]()
4.1.5.2. Ending processes
When a process ends normally (it is not killed or otherwise unexpectedly interrupted), the program returns its exit status to the parent. This exit status is a number returned by the program providing the results of the program's execution. The system of returning information upon executing a job has its origin in the C programming language in which UNIX has been written.
The return codes can then be interpreted by the parent, or in scripts. The values of the return codes are program-specific. This information can usually be found in the man pages of the specified program, for example the grep command returns -1 if no matches are found, upon which a message on the lines of "No files found" can be printed. Another example is the Bash builtin command true, which does nothing except return an exit status of 0, meaning success.
![]()
4.1.5.3. Signals
Processes end because they receive a signal. There are multiple signals that you can send to a process. Use the kill command to send a signal to a process. The command kill -l shows a list of signals. Most signals are for internal use by the system, or for programmers when they write code. As a user, you will need the following signals:
Table 4-2. Common signals
Signal name | Signal number | Meaning |
SIGTERM | 15 | Terminate the process in an orderly way. |
SIGINT | 2 | Interrupt the process. A process can ignore this signal. |
SIGKILL | 9 | Interrupt the process. A process can not ignore this signal. |
SIGHUP | 1 | For daemons: reread the configuration file. |
You can read more about default actions that are taken when sending a signal to a process in man 7 signal.
![]()
4.1.6. SUID and SGID
As promised in the previous chapter, we will now discuss the special modes SUID and SGID in more detail. These modes exist to provide normal users the ability to execute tasks they would normally not be able to do because of the tight file permission scheme used on UNIX based systems. In the ideal situation special modes are used as sparsely as possible, since they include security risks. Linux developers have generally tried to avoid them as much as possible. The Linux ps version, for example, uses the information stored in the /proc file system, which is accessible to everyone, thus avoiding exposition of sensitive system data and resources to the general public. Before that, and still on older UNIX systems, the ps program needed access to files such as /dev/mem and /dev/kmem, which had disadvantages because of the permissions and ownerships on these files:
rita:~> ls crw-r----- | -l | /dev/*mem 1 root | kmem | 1, | 2 Aug 30 22:30 /dev/kmem |
crw-r----- | 1 root | kmem | 1, | 1 Aug 30 22:30 /dev/mem |
With older versions of ps, it was not possible to start the program as a common user, unless special modes were applied to it.
![]()
While we generally try to avoid applying any special modes, it is sometimes necessary to use an SUID. An example is the mechanism for changing passwords. Of course users will want to do this themselves instead of having their password set by the system administrator. As we know, user names and passwords are listed in the /etc/passwd file, which has these access permissions and owners:
bea:~> ls -l /etc/passwd
-rw-r--r-- 1 root root
1267 Jan 16 14:43 /etc/passwd
bea:~> ls -l /etc/passwd
-rw-r--r-- 1 root root
Still, users need to be able to change their own information in this file. This is achieved by giving the passwd
program special permissions:
mia:~> which passwd
passwd is /usr/bin/passwd
mia:~> which passwd
passwd is /usr/bin/passwd
mia:~> ls -l /usr/bin/passwd
-r-s--x--x 1 root root
13476 Aug 7 06:03 /usr/bin/passwd*
mia:~> ls -l /usr/bin/passwd
-r-s--x--x 1 root root
![]()
When called, the passwd command will run using the access permissions of root, thus enabling a common user to edit the password file which is owned by the system admin.
SGID modes on a file don't occur nearly as frequently as SUID, because SGID often involves the creation of extra groups. In some cases, however, we have to go through this trouble in order to build an elegant solution (don't worry about this too much - the necessary groups are usually created upon installation). This is the case for the write and wall programs, which are used to send messages to other users' terminals (ttys). The write command writes a message to a single user, while wall writes to all connected users.
Sending text to another user's terminal or graphical display is normally not allowed. In order to bypass this problem, a group has been created, which owns all terminal devices. When the write and wall commands are granted SGID permissions, the commands will run using the access rights as applicable to this group, tty in the example. Since this group has write access to the destination terminal, also a user having no permissions to use that terminal in any way can send messages to it.

In the example below, user joe first finds out on which terminal his correspondent is connected, using the who command. Then he sends her a message using the write command. Also illustrated are the access rights on the write program and on the terminals occupied by the receiving user: it is clear that others than the user owner have no permissions on the device, except for the group owner, which can write to it.
joe:~> which write
write is /usr/bin/write
joe:~> ls -l /usr/bin/write
-rwxr-sr-x 1 root tty
8744 Dec 5 00:55 /usr/bin/write*
joe:~> which write
write is /usr/bin/write
joe:~> ls -l /usr/bin/write
-rwxr-sr-x 1 root tty
joe:~> who
jenny tty1
jenny pts/1
jenny pts/2
jenny pts/3
joe pts/0
Jan 23 11:41
Jan 23 12:21 (:0)
Jan 23 12:22 (:0)
Jan 23 12:22 (:0)
Jan 20 10:13 (lo.callhost.org)
joe:~> who
jenny tty1
jenny pts/1
jenny pts/2
jenny pts/3
joe pts/0
joe:~> ls -l /dev/tty1
crw--w---- 1 jenny tty 4,
1 Jan 23 11:41 /dev/tty1
joe:~> ls -l /dev/tty1
crw--w---- 1 jenny tty 4,
joe:~> write jenny tty1
hey Jenny, shall we have lunch together?
^C
joe:~> write jenny tty1
hey Jenny, shall we have lunch together?
^C
User jenny gets this on her screen:
Message from [email protected] on ptys/1 at 12:36 ... hey Jenny, shall we have lunch together?
EOF
Message from [email protected] on ptys/1 at 12:36 ... hey Jenny, shall we have lunch together?
EOF
After receiving a message, the terminal can be cleared using the Ctrl+L key combination. In order to receive no messages at all (except from the system administrator), use the mesg command. To see which connected users accept messages from others use who -w. All features are fully explained in the Info pages of each command.
 Group names may vary
The group scheme is specific to the distribution. Other distributions may use other names or other solutions.
![]()