
< Previous | Contents | Next >
10.2.1. Installing GParted by Using Synaptic Package Manager
Procedure 10.1. To install GParted by using Synaptic Package Manager:
1. On the System menu, point to Administration and then click Synaptic Package Manager. The Synaptic Package Manager window opens.

Figure 10.2. Synaptic Package Manager Location
2. When the Synaptic Package Manager window opens for the first time, it displays a list of all the software packages available in the Ubuntu software repositories. The left pane lists the various software categories.
You can select a specific category to view the available software packages listed in that category. Alterna- tively, you can use the Search functionality provided in the Synaptic Package Manager to locate specific software in the list.
Click the Search button to search the package you want to install. The Find dialogue box appears.
In the Search field of the Find dialogue box, type the name of the package, Partition Editor, and click the Search button. The package, gparted, is now displayed in the right pane of the Synaptic Package Manager window.
Right-click the package name to select an action that you want to perform on it. Notice that various options are available to perform a number of actions on the selected package. If the selected package is not installed currently, you can mark it for installation. If the selected package is already marked for installation, you can unmark it to clear the selection. Similarly, if the package is already installed, you may select Upgrade to upgrade the package and Mark for Removal or Mark for Complete Removal to delete the package from your computer.
To install the package, select the Mark for Installation check box.
The gparted package is now selected for installation. To continue with the installation, click Apply. This displays the Summary dialogue box.
The Summary dialogue box prompts you to perform a final check before implementing the marked changes. Click the Apply button to apply the marked changes. The Downloading package files window opens.
Wait for all the required files to download. After all the required files in the package are downloaded, the
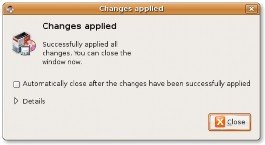
Changes applied dialogue box appears.
The Changes applied dialogue box notifies you that all the requested changes have been applied. Click
Close to exit the dialogue box.
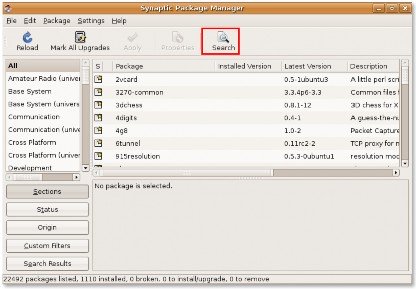
Figure 10.3. Synaptic Package Manager
3. In the Search field of the Find dialogue box, type the name of the package, Partition Editor, and click the Search button. The package, gparted, is now displayed in the right pane of the Synaptic Package Manager window.
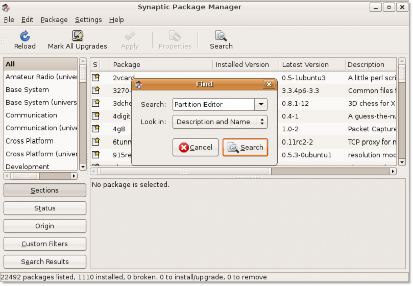
Figure 10.4. Finding a Package in Synaptic
4. Right-click the package name to select an action that you want to perform on it. Notice that various options are available to perform a number of actions on the selected package. If the selected package is not installed currently, you can mark it for installation. If the selected package is already marked for installation, you can unmark it to clear the selection. Similarly, if the package is already installed, you may select Upgrade to upgrade the package and Mark for Removal or Mark for Complete Removal to delete the package from your computer.
To install the package, select the Mark for Installation check box.
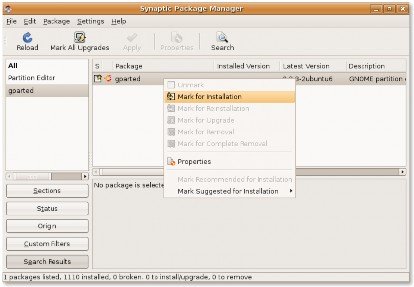
Figure 10.5. Marking a Package for installation
5. The gparted package is now selected for installation. To continue with the installation, click Apply. This displays the Summary dialogue box.
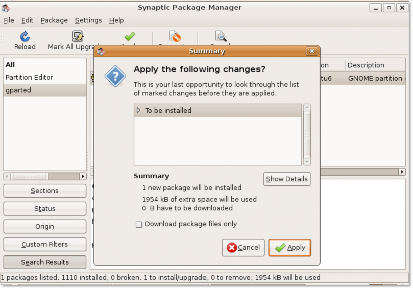
Figure 10.6. Summary Dialog Box
6. The Summary dialogue box prompts you to perform a final check before implementing the marked changes. Click the Apply button to apply the marked changes. The Downloading package files window opens.
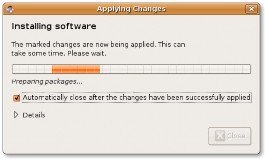
Figure 10.7. Applying Changes Box
7. Wait for all the required files to download. After all the required files in the package are downloaded, the
Changes applied dialogue box appears.
![]()
Figure 10.8. Changes Applied Box
8. The Changes applied dialogue box notifies you that all the requested changes have been applied. Click
Close to exit the dialogue box.
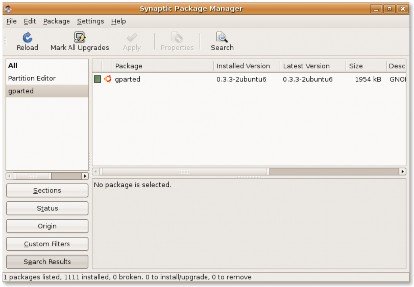
Figure 10.9. Synaptic Package Manager after Installation
9. The partition editor is installed on your computer. You can now partition the hard disk drive.
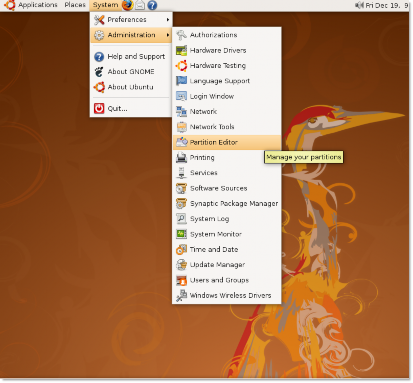
Figure 10.10. Opening Partition Editor