
< Previous | Contents | Next >
10.2.2. Partitioning Using GParted
Procedure 10.2. To partition the hard drive by using GParted:
1. On the System menu, point to Administration and then click Partition Editor. The GParted window opens.
![]() Nice to Know:
Nice to Know:
GParted is also available from the Live CD.
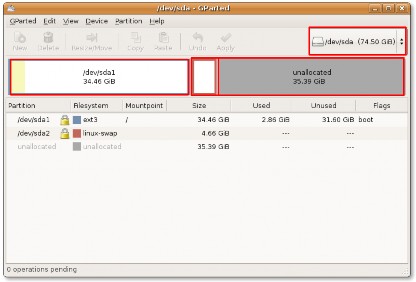
Figure 10.11. GParted Window
2. In the top-right corner of the GParted window is the drive drop-down box. You can use this box to select the hard drive that you need to partition by specifying the logical name you noted earlier. The GParted window refreshes and shows you a representation of the selected drive.
If the existing partitions on the drive have not yet been used, a white bar would run across the window. However, if the existing partitions contain some data, the data will be represented by a pale yellow area.
You can either resize an existing partition or create a new partition in the unallocated space of the hard drive. Before resizing an existing partition, you must make sure that you unmount it by right-clicking the partition and then selecting Unmount. Remember that you cannot resize a partition to be smaller than the yellow area, which represents the data on the partition.
To create a new partition in the unallocated drive space, right-click the area and select New on the short- cut menu. The Create new Partition dialogue box appears.
![]()
The Create new Partition dialogue box enables you to select specifications for the new partition. Apart from defining the size of the new partition, you can also select the partition type, whether primary or logical, for the new partition. In addition, you can even define the file system to be used on the new partition. By default, Ubuntu uses the ext3 partitions. However, if you want the new drive to be readable by both Microsoft Windows and Ubuntu without installing anything extra, you can format it as Fat 32.
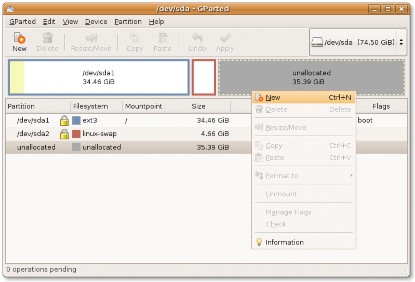
Figure 10.12. Creating a New Partition
3. You can either resize an existing partition or create a new partition in the unallocated space of the hard drive. Before resizing an existing partition, you must make sure that you unmount it by right-clicking the partition and then selecting Unmount. Remember that you cannot resize a partition to be smaller than the yellow area, which represents the data on the partition.
To create a new partition in the unallocated drive space, right-click the area and select New on the short- cut menu. The Create new Partition dialogue box appears.
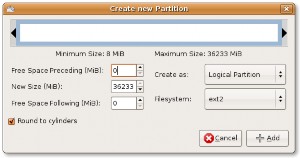
Figure 10.13. Create New Partition Box
4. The Create new Partition dialogue box allows you to select specifications for the new partition. Apart from defining the size of the new partition, you can also select the partition type, whether primary or logical, for the new partition. In addition, you can even define the file system to be used on the new partition. By default, Ubuntu uses the ext3 partitions. However, if you want the new drive to be readable by both Microsoft Windows and Ubuntu without installing anything extra, you can format it as Fat 32.
![]() Note:
Note:
If you are creating a partition on a new hard drive, select Primary Partition. An SCSI or S-
ATA hard disk can have a maximum of 4 primary partitions and 11 logical partitions while an integrated development environment (IDE) hard drive can have up to 63 partitions overall. The primary partition used to house the logical partitions is called an extended partition. Un-
like primary partitions, logical partitions must be contiguous: the blocks in the partition are following each other without any gap.
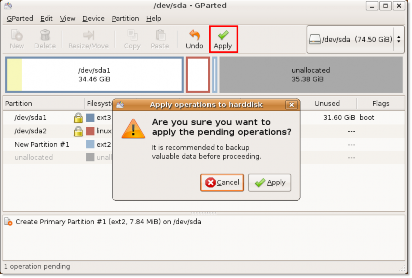
Figure 10.14. Confirmation Box
5. In the New Size (MiB) field, specify the size of the partition by using the up or down arrow key. You can also define the size by dragging the black bold arrows on the top white bar.
6. Select Primary, Logical or Extended partition from the Create as drop-down list.
7. Next, specify the file system by selecting from the Filesystem drop-down list.
8. Click the Add button to complete the partition. The white bar updates to show a new partition on the disk.
9. You can create multiple partitions at this stage by following the above-mentioned procedure and then clicking Apply to add them to the hard drive. The Apply operations to hard disk dialogue box appears.
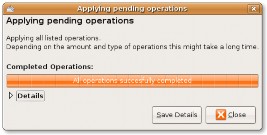
Figure 10.15. Applying Pending Operations Box
10. The Apply operations to hard disk dialogue box recommends that you back up data before performing the changes and seeks your final confirmation before applying the changes to the hard disk. Click the Apply button to partition and format the hard disk according to your specifications.
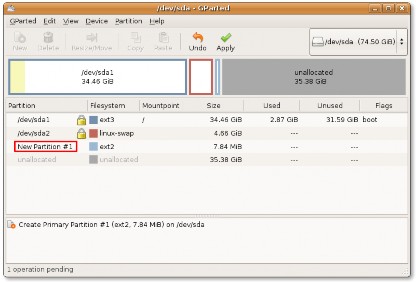
Figure 10.16. GParted with New Partition
11. The system starts applying the changes to the hard disk. The duration of the operation will depend on the size of the new partition. You can click the Details button to view more information about where and how changes are being made, whilst the operation is running.
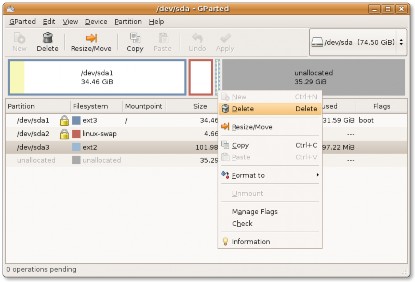
Figure 10.17. Deleting a Partition
12. Once you receive a message that all the specified operations have been successfully completed, you can safely close the window by clicking the Close button. However, if something goes wrong and the process does not complete successfully, you can save the process output for future reference by clicking the Save Details button.
13. The newly created partition is now visible in the GParted window. You will also notice that your system automounts the newly created partition.
Mounting refers to the process of attaching the newly created partition or drive to an existing directory to make it accessible. The directory where the new partition is attached is called the mount point. After the
partition is mounted, you can access the files on that partition by accessing the mount point for the new partition. Early Linux distributions did not allow the auto-mounting of new partitions or drives. However, from Ubuntu 8.04 LTS, you can easily access the new partitions by auto-mounting the partitions. When you create a new partition, the new partition opens as a separate window and the partition appears as a disk icon on the desktop.
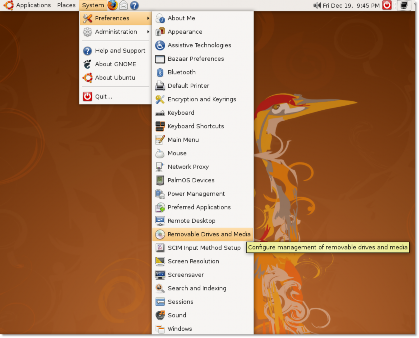
Figure 10.18. Removable Drives and Media Preferences Dialogue Box
14. When you no longer want to access the new partitions, you can unmount them by right-clicking the disk
icon on the desktop and selecting the Unmount Volume option from the short-cut menu.
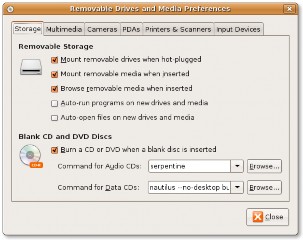
Figure 10.19. RC.Local File